Did you finish the Google Analytics 4 initial setup? If the answer is yes, do not skip the following information. You are about to get relevant insights about your audience, business, and more.
Even if you are still in the process of setting up your Google Analytics account, join us in going through the most important steps in obtaining an accurate overview of your online ecosystem.
To get the most out of Google’s Data Analytics Service, you need to customize your implementation based on your specific scenario (business type, specific key events, and more). You will discover more about the most important settings you must address once the initial implementation is finished.
Just a quick reminder, if you haven’t yet decided to set up GA4, you are wasting valuable time. Every day you delay this, you lose historical data, which you can analyze at a further date. Keep in mind that data won’t back-populate after you implement GA4. For example, if you implement the GA4 property on the 1st of April, you will start to see the data from that day forward, and you won’t be able to see any insights before that date.
You already know that Universal Analytics (the former Google Analytics version) will stop recording hit data on July 1, 2023.
If you need help with the implementation, we have great news for you. Zitec has handled the implementation of Google Analytics 4 for its portfolio of clients, and we will be more than happy to help you as well. We even have an entire GUIDE designed to help you prepare for the Google Analytics 4 implementation, which also includes everything you need to know for a smooth switch.
The five post-implementation settings you must do after setting up the GA4
1. Data retention
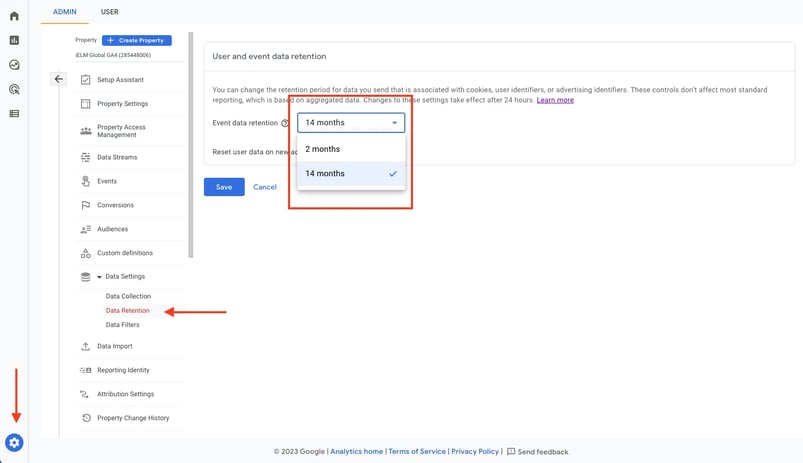
Under Admin -> Data Settings -> Data Retention, you’ll find the event data retention setting.

But we recommend implementing this in coordination with your Data Protection Officer or legal team. This change can impact your internal policies.
As Google states, Google Analytics Data Retention controls let you set the amount of time before user-level and event-level data stored by Google Analytics is automatically deleted from Analytics servers.
2. Service Linking
It is one of the most straightforward actions you can take, but it has a huge impact on your data collection.
What services could you link with GA4? Here are some of the highlights:
- Google Ads (Google’s advertising service);
- Google Search Console;
- Merchant Center;
- Display & Video 360.
Linking other services will allow data to flow freely from that service to GA4. Also, it lets you analyze the additional data to make better-informed decisions. After all, the world is all about data-driven decisions, why won’t you be as well?
Do you need help with the mentioned services? Check out our digital marketing services portfolio!
3. Google Signals
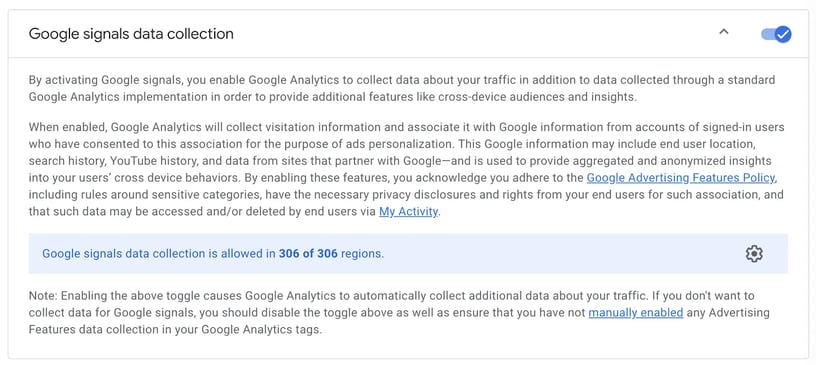
Under Admin -> Data Settings -> Data Collection, you’ll find the Google Signals feature. This is another key setting of the GA4 ecosystem.

In this article from Google, you can find the official description for this feature. Let’s read it together ”Google signals are session data from sites and apps that Google associates with users who have signed in to their Google accounts and who have turned on Ads Personalization. This association of data with these signed-in users is used to enable cross-device reporting, cross-device remarketing, and cross-device conversion export to Google Ads.”
The important takeaway? You won’t be able to access some reports you were used to in UA if you don’t activate Google Signals. Some examples of missing features are:
- Demographics and interests reports - enabling Google Signals allows you to analyze the average age of users visiting your website;
- Remarketing lists for Google Ads - it will help you to create one or more remarketing audiences to test in Google Ads.
As with many things in GA4 and data tracking, you’ll have to make sure you have the full support of your legal team before activating this feature. Make sure you understand the implications of it and then explain those to your best ability to your legal team, which should advise you in activating or keeping this feature off. If it’s already activated, you have the option to turn it off at any time.
4. Event setup
You can think about events as building blocks of GA4, the fundamental data units, and they can be anything. Events can provide transactional information, user information, performance information, or you name it!
Because you can create a vast array of events, you will need to be thoughtful when designing your tracking architecture (you’ll see why this is important when we get to custom dimensions & metrics).
What you’ll have to do to improve your data collection is to:
- Implement the property correctly;
- Make the proper GA4 setting;
- Setup events.
Let’s talk about the 3rd point.
Types of events
There are four types of events in GA4, and they are as follows:
- Automatically collected events;
- Enhanced measurement events;
- Recommended events;
- Custom events.
The first two types of events should be automatically collected if you have followed the correct initial setup for the property. We’ll focus on the last two below.
Recommended events
Recommended events can enable additional functionality of GA4 once implemented. There are some general-purpose events for all types of business verticals such as login, purchase, search, and vertical-specific events like add_payment_info, add_to_cart, and refund for eCommerce verticals.
You won’t need any additional setup to use those newly available events in your GA4 reports.
These events are powerful and can offer deep insights into business performance and user actions. The reason why they are not tracked automatically is related to how each platform is built. Let’s take login, for example, not all CMS handles login in the same way, and let’s not add custom-developed platforms in the mix. The baseline is that, if you need them, recommended events are a must!
Custom events
These are the key to custom tailor GA4 reports based on your business specifics.
When setting up custom events, make sure you check out the official documentation regarding event collection limits.
Custom events are usually paired with additional data called event parameters. Let’s take an example to make things more clear. Let’s say the event we want to track is “donation”, a parameter would be “donation_amount” or “donor_status”. You can send event data along with additional parameters in GA4 in many ways, two of the most common are:
- Hardcoding the event code in the website;
- Using a tag manager tool (Google Tag Manager, for example).
Sending the events is just the first part of the equation. Given that the parameters we send to GA4 can be anything, we have to explain to Google what we are sending. This explanation comes in the form of custom dimensions and custom metrics. If you’ve done custom UA implementations in the past, you’ll be familiar with those terms.
Custom event setup requires a thorough tracking strategy. The reason? You have access to a limited amount of custom metrics and dimensions. (see the table below)

(Source: [GA4] Custom dimensions and metrics - Analytics Help)
We won’t go into all the nits and grits of the process, because each business has its specific scenario for implementation. In a nutshell, the basic steps are as follows (using Google Tag Manager):
- Decide upon the tracking architecture and make a list of required events and parameters;
- Setup the GA4 event tag by selecting the: Google Analytics: GA4 Event tag template in GTM (Google Tag Manager);
- Add the additional required parameters in the appropriate field (in the tag setup process);
- Add the tag trigger, test the tag, and deploy it live on your website;
- Setup the required custom dimensions and metrics in GA4 by following: Admin -> Custom definitions -> Create custom dimensions/metrics
e.1. Here you’ll have to provide a name, scope, and description (optional) and select the actual event parameter (sent via GTM) - Make sure to check the tracking accuracy in the following days after the implementation.
If you need help with the technical details of the implementation, our team is one email away.
5. Audience creation
Now that we’ve talked about Google Signals (see the point above), we know that to access this feature, we must activate those. Adding to this, we now know that we can, and must, in this case, link GA4 with Google Ads to allow data to flow between the two platforms.
Here is your checklist:
- Connect GA4 with Google Ads;
- Activate Google Signals.
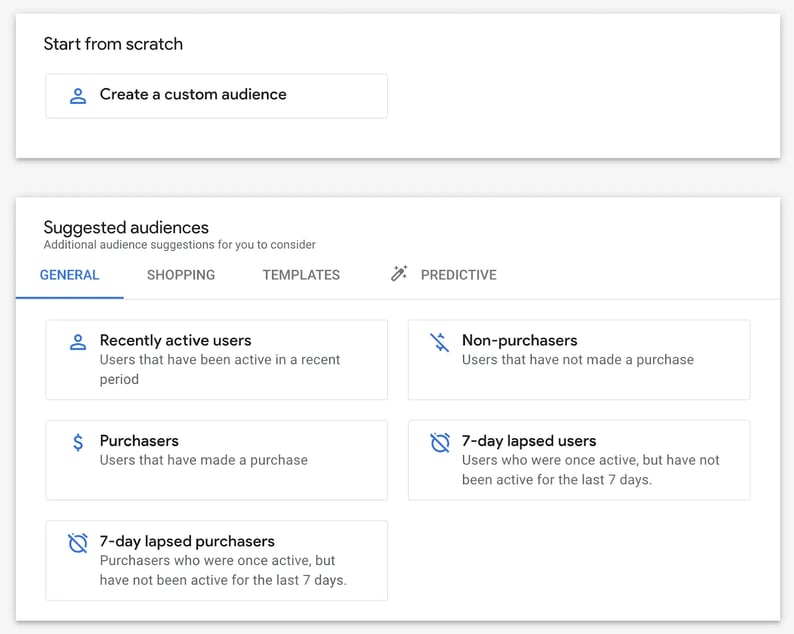
After these steps, you are ready to create audiences. To create a new audience, you’ll have to navigate to Admin -> Audiences -> New Audience.
It will open up the audience creation interface, which, for the ones of you acquainted with the UA’s interface for this, is quite different.

The first thing you’ll notice is that you either have the option to go the route of “Suggested audiences” and Google makes the process a little bit easier for you, or you go the “Create custom audience” route, which has no guidance and offers you all the options. As with the custom dimensions and metrics, there are limits in GA4, and it also applies to audiences. The official documentation states that “there is a limit of 100 audiences per property.” (Source: [GA4] Create, edit, and archive audiences - Analytics Help)
Is a small number even for SMBs, but larger companies will feel its impact a lot harder. You will need a plan for handling this area, making the most of the available audience limit. Start with the business's essential audiences and expand from there.
(Disclaimer: All business types are different, and this list might not fit your case, but those are some of the most common). Some of the most important audiences you can set are:
- Users that have purchased in the past/existing clients/partners - those people not only have interacted with your business but have purchased from you or have an active subscription;
- Users that have subscribed to your Newsletter - by completing this action, the user shows commitment and trust to your business (make sure not to break it by spamming its inbox). You can also interact with such users via other types of campaigns by creating such an audience;
- Users that have abandoned key pages (cart, checkout, form submission page) - those users were at the point of completing one of your most important actions in the website/app. Make sure to re-engage with them and transform them into clients.
An important aspect of setting up your audience is selecting a membership duration (the number of days your user will be a part of the list).
For example, if you have a fashion online store/shop with lots of data, you can create an audience with all the users that have abandoned the checkout process and set the membership duration to 1 day. However, if you have a B2B business, and the deal signing process takes up to 1 year to fulfill, you could set up an audience with a membership duration of 365 days (the maximum is 540 days).
Even if we are talking about audiences, events, or another custom setup, you need to make sure that every data is collected properly for your business needs. Each data could be useful in deciding on your website and other business actions. Let us help you set up the Google Analytics 4 audiences. We have already set it up for countless clients with exceptional results in terms of campaign performance.
These are just a few of the options available in GA4. There are many more features to talk about. We hope this article will help you improve your tacking architecture and get better insights about your business!


.jpg)
